⚡ Fast & Light Linux VM + GUI on MacOS

Table of Contents
Fed up with clunky Multipass, UTM, or VirtualBox setups for school/work?
Let’s get set up in minutes with a much better alternative!
- Works on Macs with Apple Silicon (M-series) or Intel chips
- emulate both
armandx86arch
- emulate both
- copy/paste between Mac and VM
- setup in <5m, instant bootup
Prerequisites #
Very simple, caveman clicks button and installs:
- Install XQuartz (if GUI needed): xquartz.org
- Install OrbStack (VM): orbstack.dev
- Visual Studio Code
- Install Remote - SSH
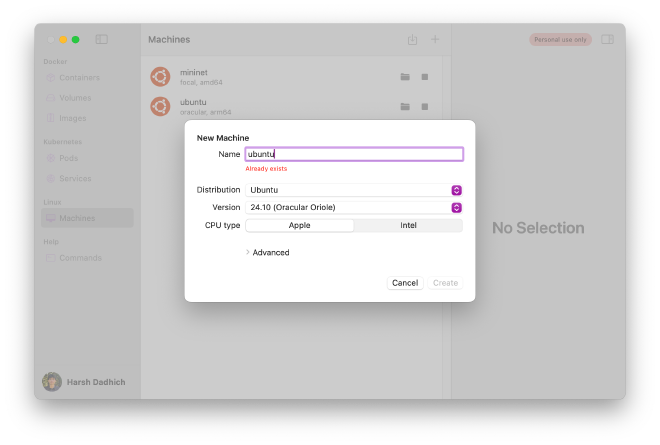
Create VM #
Default settings are fine

Connect to VM #
Default #
If you only have 1 VM, double-click it in OrbStack or ssh orb from a terminal
Multiple #
If you have multiple, for the default just do like done above, but for another do:
ssh <vmname>@orb
or just double-click in OrbStack
GUI #
Installation #
Inside the VM, run this:
sudo apt install -y openssh-server xauth x11-apps nscd
What is this doing?
openssh-server: Enables remote SSH accessxauth: Manages X11 forwarding authx11-apps: Provides basic X11 GUI toolsnscd: Grants browsers access to the internet
Setup #
Still in the VM, run this:
sudo vim /etc/ssh/sshd_config
This brings up config, find and ensure these lines are set like this:
helpful: i to edit, :wq to save + exit, :q! to force quit without save if you mess up
X11Forwarding yes
X11DisplayOffset 10
X11UseLocalhost yes
Now saved, let’s reload:
sudo systemctl restart ssh
Let’s set a password (anything is fine, just remember it):
sudo passwd $USER
Let’s also allow browsers to use the GUI:
echo 'export XAUTHORITY=$HOME/.Xauthority' >> $HOME/.profile
Connect (w/GUI) #
Important: Do this inside a fresh new MacOS terminal (not VM)
Connect with X11 (-X) forwarding:
ssh -X vmnname.orb.local
Replace vmname with the name of your VM, e.g. mininet
App Usage #
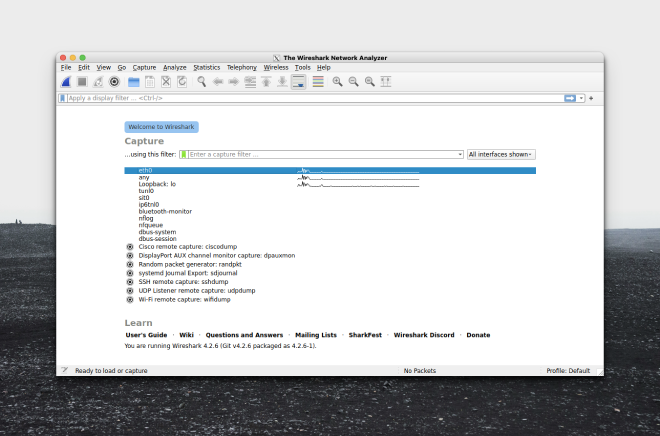
Now that you’re ssh -X’d into the VM, you can run GUI apps!
Run apps (in background):
app &
Replace app with the app you want to run, e.g. wireshark, firefox, code, etc.
Also note, bidirectional clipboard is supported!
- Command + C to copy on MacOS
- Ctrl + V to paste on GUI
- and vice versa
Code in VSCode #
Here’s how to edit in VSCode if you’re a Vim hater
- Install Remote - SSH
- Open VSCode, click TV icon on left sidebar or left-most-bottom icon
Default #
If you only have 1 VM, it should already show up as orb, just click it and you’re in
Multiple #
If you have multiple, for the default just connect to orb, but for another do:
- Connect to Host
- Add New SSH Host
ssh vmname@orb- Cmd + Shift + P, type in “Install code PATH” and enter
- Now just open up a fresh terminal
- Do as you please, use
code <filepath>to open stuff in VSCode
with GUI #
Now sometimes, you want to avoid having a seperate terminal, and separate VSCode
- Why?
- The seperate terminal is where you
ssh -X ...- this means GUI enabled
- VSCode’s connection is just a regular
ssh ...
- The seperate terminal is where you
First, install the Remote X11 extension
Then do the steps above, but replace #3 with ssh -X vmname.orb.local
Only caveat is you have to input your password every time you open VSCode (you’ll live)
UCSC Classes Setup #
Many programming classes require a Linux VM, let’s get set up!
Skip to the class you want:
- CSE 13S, 101, 130 (C/C++)
- CSE 30, 40, 140/X, 183 (Python)
- any class that uses
python3really
- any class that uses
- CSE 150 (Mininet + Wireshark)
SSH Setup #
Let’s link up your VM to your git.ucsc.edu or GitHub account
Generate a new SSH key:
ssh-keygen -t rsa -b 4096 -C "OrbStack" -N ""
Add the key to your SSH agent:
eval $(ssh-agent -s)
ssh-add ~/.ssh/id_rsa
Now let’s grab the public key:
cat ~/.ssh/id_rsa.pub
Now add the output of this to:
- Preferences > SSH Keys > Add new key if on git.ucsc.edu
- Settings > SSH and GPG Keys > New SSH key (or login and click this) if on GitHub
You can name the key whatever, I just go with OrbStack
CSE 13S, 101, 130 #
Open this guide on a laptop, so you can jump back here through the right sidebar
For C/C++ based classes
Do prereqs (GUI not needed), create the VM like done here, then come back here
Simply
ssh orb, then run the following:
sudo apt install clang clang-format clang-tools make net-tools valgrind
Setup SSH to hook up to your class repo(s) like done here
Setup to code through VSCode like done here
Some VSCode extensions to make your life easier:
- C/C++ Extension Pack Syntax highlighting
- Error Lens See errors without hovering
- Clang-Format Auto-formatting
- Cmd + Shift + P and type in “Format Document With”
- Configure Default Formatter > Set to clang-format
- Go to editor settings, search for and enable “Format on Save”
CSE 30, 40, 140/X, 183 #
Open this guide on a laptop, so you can jump back here through the right sidebar
Do prereqs (GUI not needed), create the VM like done here, then come back here
Simply
ssh orb, then run the following:
sudo apt install python3-venv python3-pip python-is-python3 xz-utils
Setup SSH to hook up to your class repo(s) like done here
Setup to code through VSCode like done here
Some VSCode extensions to make your life easier:
- Python Extension Pack Syntax highlighting
- Python Auto Venv Auto-activate venvs
- Jupyter Support for
.ipynbnotebooks - Black Formatter Auto-formatting
- Cmd + Shift + P and type in “Format Document With”
- Configure Default Formatter > Set to black
- Go to editor settings, search for and enable “Format on Save”
FAQ #
- Sometimes
.ipynb/ notebooks don’t load, do this:
pip install ipykernel --break-system-packages # don't worry lol
- Here’s how to set up a virtual environment (venv) for your class:
For starters, cd into your project dir and create a venv:
python -m venv venv # the second 'venv' is the name, can be anything
Now activate it:
source venv/bin/activate
Now you can install packages:
pip install <package>
# or
pip install -r requirements.txt
CSE 150 #
Open this guide on a laptop, so you can jump back here through the right sidebar
Do prereqs (GUI needed), then come back here
Since manual config sucks, here’s a faster way with a cloud-init script:
- Click Raw and then Command + S
- Save as
cloud-init.ymlunder~/Desktop(make sure to add the.yml)
- Once done, open up a terminal and run:
cd ~/Desktop
orb create -a amd64 -c cloud-init.yml ubuntu:focal mininet
What’s happening here?
orb create: Creates a new instance-a amd64: Specifies the architecture:arm64(ARM) oramd64(x86)- Why not latest? The labs used x86
-c cloud-init.yml: Specifies the cloud-init file to useubuntu:focal: Specifies the Ubuntu version (focal for 20.04)- Why not latest? The labs used 20.04 (as of W25)
mininet: Specifies the name of the instance
It’ll take <5m to install + config
- Still need to do a little bit of manual config, SSH into it:
ssh mininet@orb
- We need to change the password to
ssh -Xinto it later:
sudo passwd $USER # set as whatever, just remember it
- Nearing the end, just need to install wireshark:
sudo apt install -y wireshark
Select yes on purple screen prompt with ← key + return key (enter)
- Almost done, just need to clone the POX controller:
git clone https://github.com/noxrepo/pox.git
chmod +x ~/pox/pox.py
- Done! First type in
exit, and then connect using the instructions here - Also, read entirely through App Usage
FAQ #
Note that instead of
chromium, this script usesfirefoxfor the browser- doesn’t make a difference, it’s just faster
For OpenFlow labs, use this filter in Wireshark:
openflow_v1
If that doesn’t work, try all nums up till _v6
- Sometimes your controller might be already binded, let’s kill the existing process:
sudo kill $(sudo lsof -t -i:6653) 2>/dev/null || true